Integrate an NLU System
Supported Systems
Currently only Cerence Mix is supported. An integration of RASA as an alternative offline NLU is planned.
A small SmartHome example with the Cerence plugin can be found on Github at the following address:
https://github.com/DFKI-AID/stepDP-SmartHome-Example
Nevertheless, it is worth following the tutorial here for understanding.
Prerequisites
You need a working Maven project that has already added stepDP as a dependency (as shown in the Getting Started Tutorial).
Setting up Dependencies
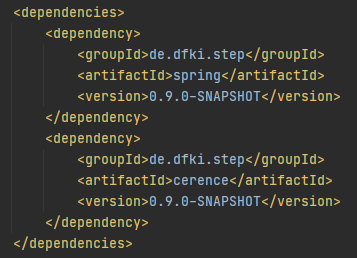
Open your pom.xml and add the cerence artifact into the dependencies (since we do not update the images with every release, just ignore the version number in the image).
<dependency>
    <groupId>de.dfki.step</groupId>
    <artifactId>cerence</artifactId>
    <version>[1.0.0,1.1.0)</version>
</dependency>
What does [1.0.0,1.1.0) mean?
The syntax [1.0.0,1.1.0) stands for every version between 1.0.0 and before 1.1.0. This means that bugfix releases are automatically included, but not releases with a new function.
Remove the spring dependency of stepDP
As already mentioned, stepDP consists of different modules. Since the cerence has the spring module as dependency (and therefore also the core module), it is sufficient to add only the cerence module as a dependency to your project. Then the highest possible version of stepDP compatible with the nlu module is automatically integrated.
This also makes it easier to maintain the versions of the modules and prevents incompatibilities.
One reason against this approach is if one is limited to a specific version of stepDP.
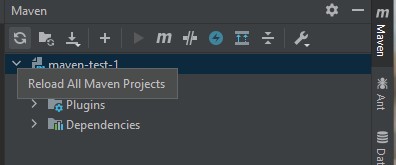
Re-import your Maven project. To do this, click on Maven in the top right corner and select "Reload All Maven Projects".
You should then have the namespace de.dfki.step.cerence available in your project.

Createn a Cerence Mix Project
Tip
The documentation of Cerence Mix can be found under https://developer.cerence.com/documentation/
Open https://developer.cerence.com/ and create an account. Please use your @dfki.de mail address.
Note
To be added to the DFKI namespace, please contact Michael Feld (michael.feld@dfki.de). He manages the DFKI Namespace.
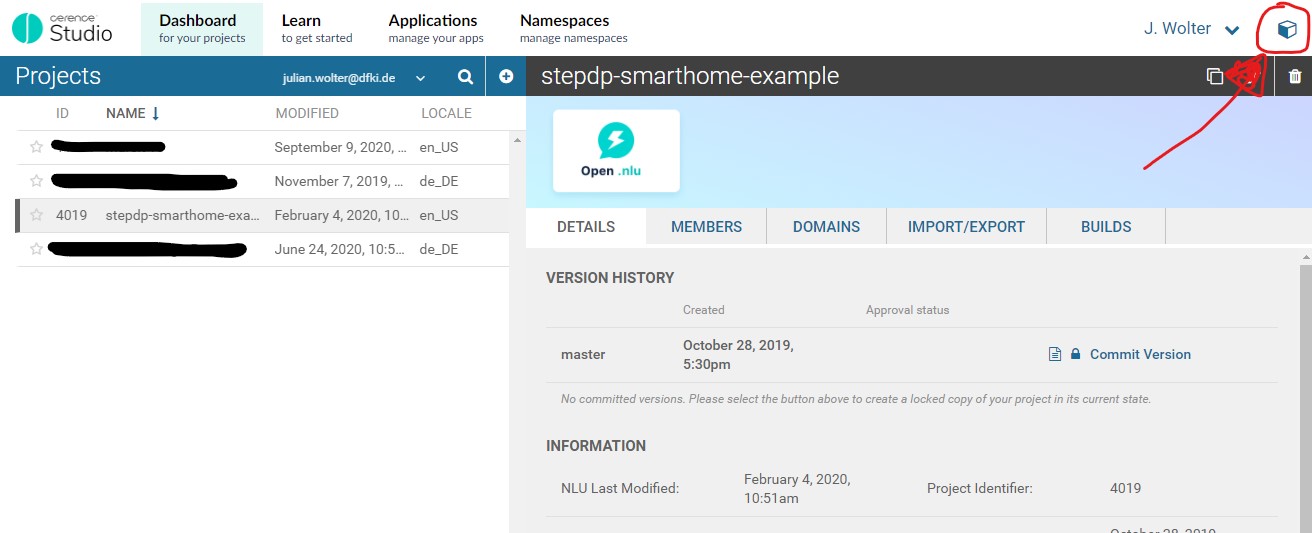
After you have created your project, it must first be built. To do this, select your project and open the console in the top right corner.
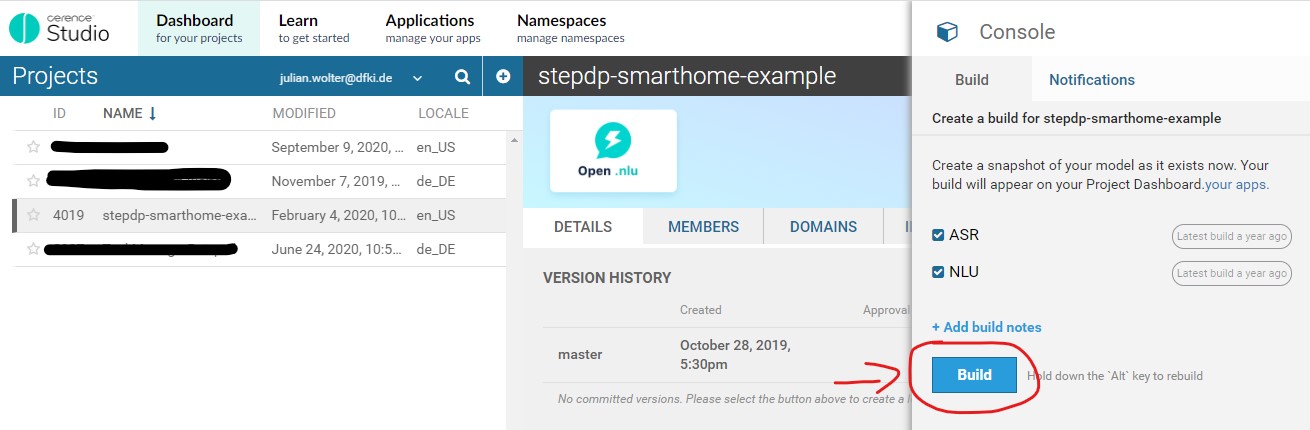
Select ASR and NLU and build the project. Wait until the project is finished (status is available under Notifications).
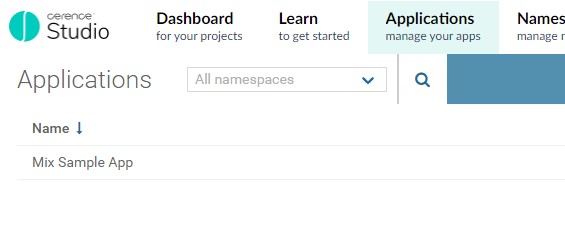
Then click on Applications at the top and select the Mix Sample App.
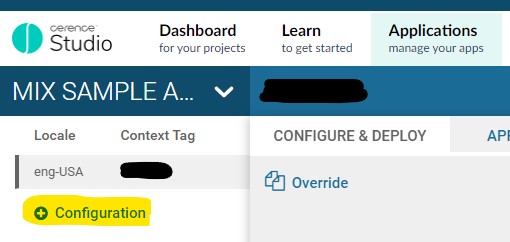
Create a new configuration to deploy your application in Cerence Mix.
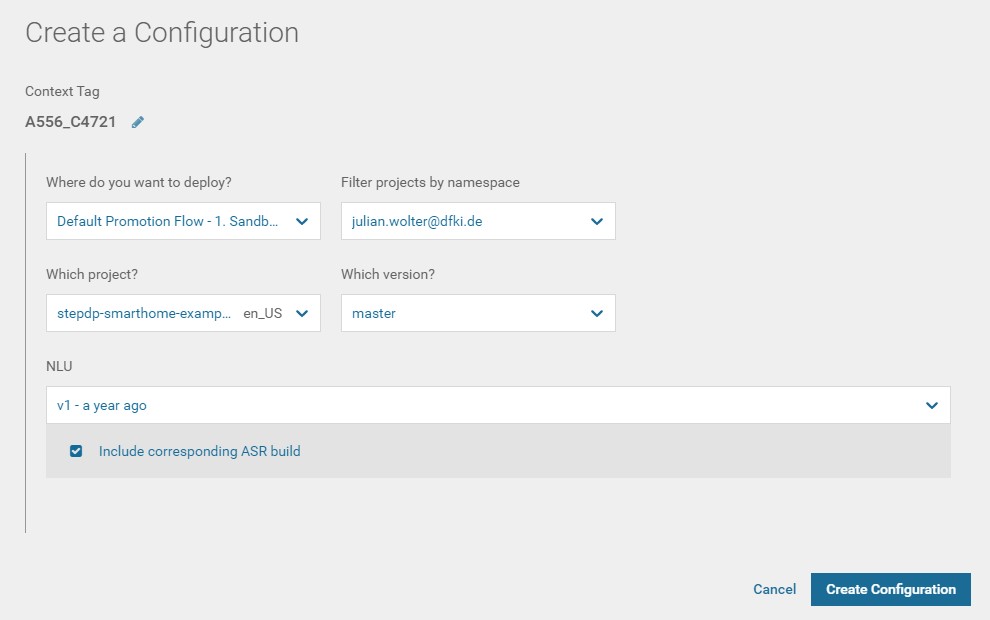
Now select your application and the last build. If you want, you can still edit the context tag (only letters, numbers and underline). Then click on Create Configuration
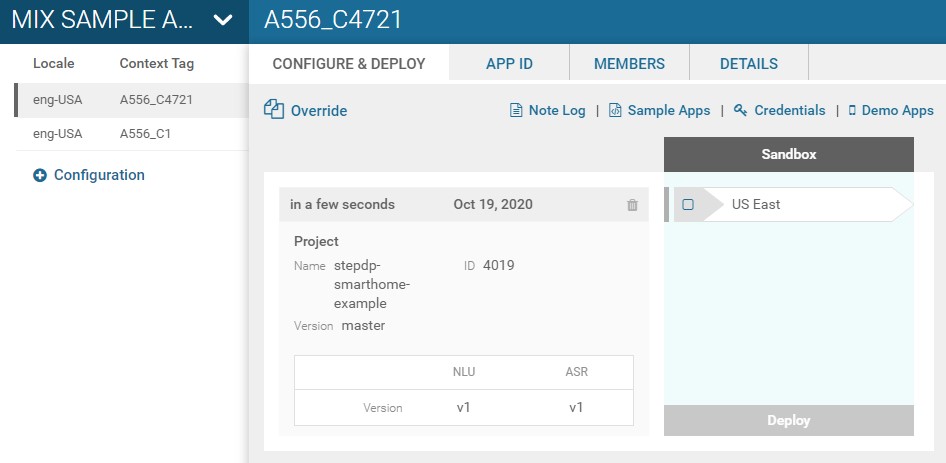
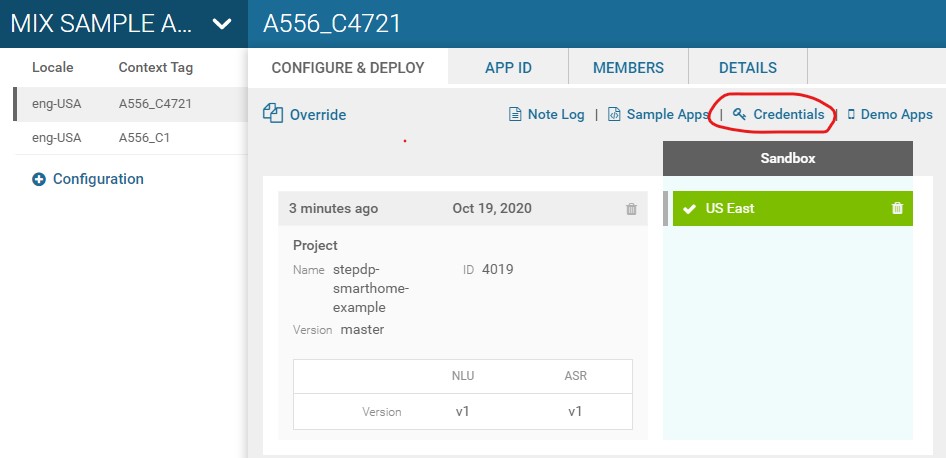
Your configuration has now been created. Now select US East and click Deploy at the bottom to make your application available for stepDP.
To access the url, app ID and key, click on Credentials in the top right corner...
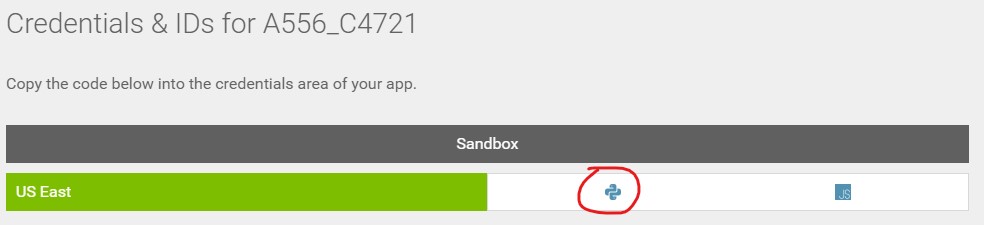
...select the Python symbol...
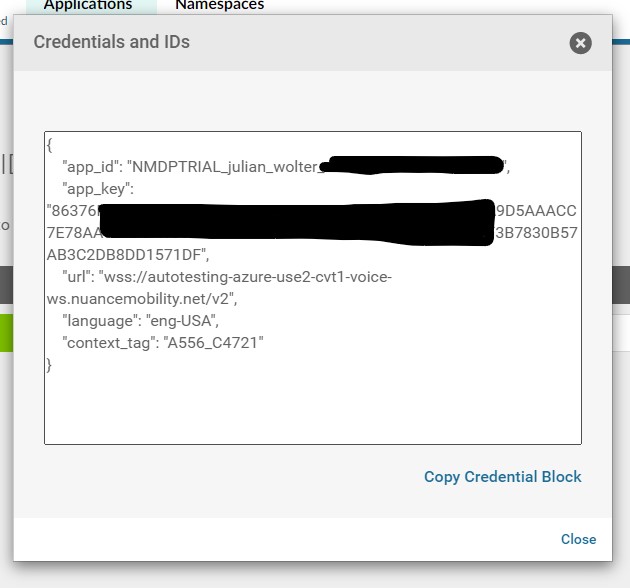
...and copy the credentials. You will need them in a later step.
Creating the NLU Controller
Now we can create the NLU Controller by inserting the following code into our example project:
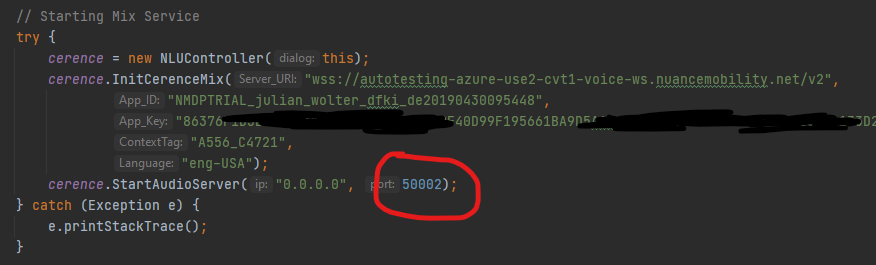
public static de.dfki.step.cerence.NLUController cerence;

[...]

try {
    cerence = new NLUController(this);
    cerence.InitCerenceMix("wss://autotesting-azure-use2-cvt1-voice-ws.nuancemobility.net/v2",
            "NMDPTRIAL_julian_wolter_dfki_de20190430095448",
            "86376F1D3BF1805A1ED8C8CFE637463A9F40D99F195661BA9D5AAACC7E78AA081DCA18CF47AB8BC556133D2843ADCDA8A97CA4F3B7830B57AB3C2DB8DD1571DF",
            "A556_C4721",
            "eng-USA");
    cerence.StartAudioServer("0.0.0.0", 50002);
}
catch (Exception ex)
{
    System.out.println("Something went wrong: " + ex.toString());
}
First we create a static variable, which contains the controller. Then we create the controller and initialize the Cerence Mix interface. For this we use the credentials from the previous step. Finally we start the audio server on port 50002.
As soon as an intent is recognised, the name of the intent is matched to the type with the same name. The entities are added to the type and the resulting token is placed on the blackboard.
A small example of this can be found on Github: https://github.com/DFKI-AID/stepDP-SmartHome-Example
Control via Web Interface
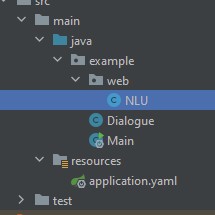
Now that we have created the NLU Controller, we have to make it accessible via the web interface. For this purpose we create the package web and add the class NLU.
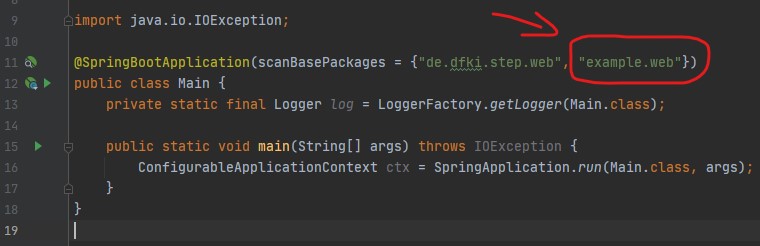
In order for this package (and its class) to be accessible via the web interface, we need to add the package to the spring boot at the application's entry point.
Now we can add functions to the web.NLU class to control the NLU input.
package example.web;

import example.Dialogue;
import org.springframework.http.HttpStatus;
import org.springframework.http.ResponseEntity;
import org.springframework.web.bind.annotation.GetMapping;
import org.springframework.web.bind.annotation.PostMapping;
import org.springframework.web.bind.annotation.RequestParam;
import org.springframework.web.bind.annotation.RestController;

import javax.annotation.PostConstruct;
import java.util.Map;

@RestController
public class NLU {
    @PostConstruct
    protected void init() {
        // nothing to do here in this case
    }

    @GetMapping(value = "/nlu/voice/status")
    public ResponseEntity getVoiceStatus() {
        try {
            System.out.println("Get Listening Status");
            if(Dialogue.cerence.IsListening())
                return ResponseEntity.status(HttpStatus.OK).body("recording: true");
            else
                return ResponseEntity.status(HttpStatus.OK).body("recording: false");
        } catch (Exception ex) {
            return ResponseEntity.status(HttpStatus.BAD_REQUEST).body(ex.getMessage());
        }
    }

    @PostMapping(value = "/nlu/voice/status")
    public ResponseEntity setVoiceStatus(@RequestParam Map<String, Object> body) {
        try {
            if(body.containsKey(("mic")))
            {
                switch((String)body.get("mic"))
                {
                    case "open":
                        System.out.println("NLU: Open Mic");
                        Dialogue.cerence.StartListening();
                        return ResponseEntity.status(HttpStatus.OK).body("ok");

                    case "close":
                        System.out.println("NLU: Close Mic");
                        Dialogue.cerence.StopListening();
                        return ResponseEntity.status(HttpStatus.OK).body("ok");

                    default:
                        System.out.println("Invalid Post request");
                        return ResponseEntity.status(HttpStatus.INTERNAL_SERVER_ERROR).body("invalid request");
                }
            }
            else
            {
                System.out.println("Invalid Post request");
                return ResponseEntity.status(HttpStatus.INTERNAL_SERVER_ERROR).body("invalid request");
            }
        } catch (Exception ex) {
            return ResponseEntity.status(HttpStatus.BAD_REQUEST).body(ex.getMessage());
        }
    }


    @PostMapping(value = "/nlu/text")
    public ResponseEntity analyzeText(@RequestParam Map<String, Object> body) {
        try {
            if(body.containsKey(("text")))
            {
                String text = (String)body.get("text");
                Dialogue.cerence.AnalyzeText(text);
                return ResponseEntity.status(HttpStatus.OK).body("ok");
            }
            else
            {
                System.out.println("Invalid Post request");
                return ResponseEntity.status(HttpStatus.INTERNAL_SERVER_ERROR).body("invalid request");
            }
        } catch (Exception ex) {
            return ResponseEntity.status(HttpStatus.BAD_REQUEST).body(ex.getMessage());
        }
    }
}
You can now initiate, start and stop the voice input via the stepDP AudioManager (stepAM). You can also send text via POST to /nlu/text, which is then analysed by the NLU service.